Most robotics demos show you one piece of the puzzle. You get the hardware setup, or the training run, or the deployment step. Rarely do you see all three stitched together into a single, working workflow. This post walks through exactly that, using one of our favourite robots to work with here at Neuracore: the mechArm 270 Pi from Elephant Robotics.
Why the mechArm 270 Pi
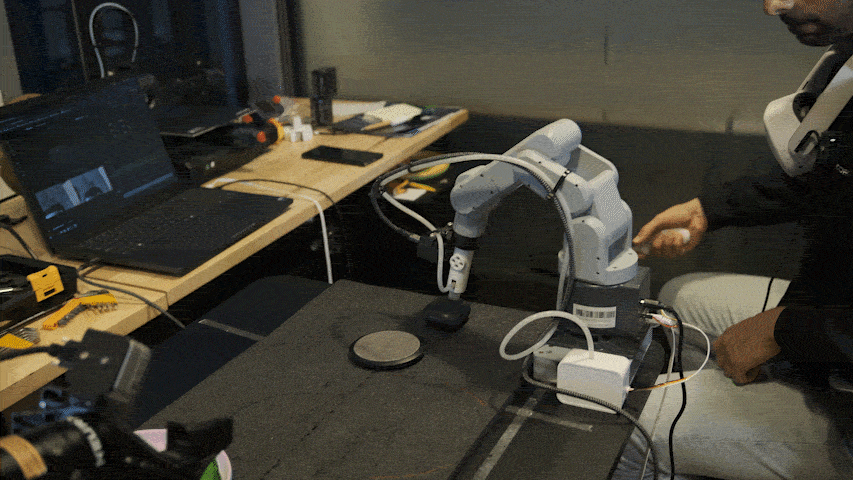
The mechArm 270 Pi is a six-axis collaborative robotic arm built with education and development in mind. That design philosophy matters more than it might seem. When your hardware is approachable, you spend your time solving the interesting problems, like getting a robot to perceive and interact with its environment, rather than fighting with complex setup and configuration. Universities, research labs and individual developers use it to prototype real manipulation tasks. It is lightweight, reliable, and as this demo shows, you can go from zero to a trained, deployment-ready model faster than you might expect. For this demonstration, we fitted the arm with the micro suction pump attachment mounted on a G-shaped base, a simple but capable end effector for pick-and-place tasks.
Recording the Data
Before you can train anything, you need demonstrations. We collected ours using the Meta Quest for teleoperation, with a hand controller configured for deliberate, controlled movement. A few key mappings worth knowing: the A button enables robot movement, B sends the arm to a predefined home position, and the joystick button toggles recording on and off. The analog trigger controls the suction cup, with 50% as the threshold between active suction and off. Both the teleoperation script and the streaming setup are available open source on our GitHub. One design decision we are particularly pleased with: we added a grip button as a dead man switch. The robot will not move unless you are actively holding that button and commanding it. If you put the controller down, the arm stays put. It keeps data collection deliberate and safe. On the visualisation side, you get a live feed from the stereo camera (left and right frames), joint state inputs, and the controller output, all streaming simultaneously. Knowing exactly what is being recorded, and confirming it looks clean, is worth the few minutes it takes before you start collecting.
Configuring the Training Job
With data collected, the next step is setting up a training job in Neuracore. The process is straightforward. You name the job, select your dataset, and configure a few key parameters. The most important of these is frequency. You need to know what your hardware can reliably handle. For our setup, that was around 10 Hz, so that is what we selected. One feature worth highlighting here: Neuracore records data aperiodically by default. This means if you want to change your training frequency later, you can resynchronise against the same raw dataset without recollecting everything from scratch. Given that data collection is usually the most expensive part of any robotics project, that flexibility has real value. For the algorithm, we used diffusion policy, which is well suited to the manipulation task at hand. We configured it to take RGB images, joint positions and gripper values as inputs, and to output target joint positions and gripper commands. On compute, smart allocation is enabled by default. It looks at your model size and dataset size and recommends a GPU configuration accordingly. You can override this manually if needed. Advanced options give you control over batch size, training epochs, and prediction horizon, though the defaults are solid starting points for most tasks. Once you are happy with the configuration, you submit the job. The platform handles virtual machine provisioning, dataset synchronisation and training launch automatically. Logs and metrics become available as training progresses.

Two Paths to Deployment
When training completes, you have two options for getting your policy onto the robot. The first is local deployment. Download the trained model directly to your device and run it using the example scripts provided in the open source repository. This works well if your local hardware has sufficient GPU capacity. The second option is hosted deployment via Neuracore endpoints. If your hardware is not powerful enough to run inference locally, or you are working with a larger policy, you can spin up a hosted endpoint. The script collects observations and states from the robot, sends them to the endpoint, receives the computed action horizon back, and executes it on the hardware. The robot does not know or care where the inference happened. Setting up an endpoint takes minutes. Select your trained model, give the endpoint a name, choose a GPU, and set a time limit if you want to avoid runaway costs. Once the status shows as activated, copy the endpoint name into your script and you are running.
The Full Picture
What makes this workflow compelling is not any single component. It is the fact that it all connects. Teleoperation to data collection to training to deployment, with open source tooling at every step and a platform that handles the infrastructure so you can stay focused on the problem you actually want to solve. The mechArm 270 Pi is a capable, accessible arm. Paired with Neuracore, the path from a robot that does nothing to one that can reliably execute a learned task is shorter than most people expect. That gap closing is what the next phase of robotics development looks like. Watch the full video below: